
This article pertains to Amre Supply sites and employees only. This does not pertain to US or Canada employees.
Welcome Amre Supply employees. This article outlines your role and the timing of what will occur for the successful migration of your computer from Amre Supply management to Reliable Parts management.
- IF YOU PRINT THIS ARTICLE know that it may change frequently throughout the transition. Instead, bookmark it on your smartphone.
- READ THE ENTIRE ARTICLE FIRST before attempting to do anything.
This article is intended for...
- all branch, office, and call center employees
- remote employees that are not in the office regularly or at all
LEAVE YOUR COMPUTER(S) PLUGGED IN, POWERED ON and CONNECTED TO A LIVE NETWORK/WI-FI AT ALL TIMES. DO NOT POWER DOWN.
About printing this article
This article is a living document that may change throughout the transition to Reliable Parts. We highly suggest you print a new version of the document daily to pick up any prior day changes or have it bookmarked/favorited in your smartphone browser.
Table of contents
This document is broken up into various sections:
What to expect during conversion
Back up important data to your Amre OneDrive
Agent-led supplemental recovery options
Branch hardware staging procedures
What to expect during conversion
Beginning the week of Feb 23 through Mar 6, we'll be transitioning computers from Wolseley management to Reliable Parts management. This process will attempt to reset all computers. The largest concentration of computers to be migrated beginning Fri Feb 27 through Sun Mar 1.
NOTE Office workers that part-time work from home, your last day to prepare your computer at the office is close of business Wed, Feb 25.
| M | T | W | T | Fri 2/27 | Sat 2/28 | Sun 3/1 | Mon 3/2 |
|---|---|---|---|---|---|---|---|
|
Back up data that resides on your local computer You will be backing up your data to Amre OneDrive using these instructions. Branch employees Remote employees |
Accounts access All Amre Supply employees will be signed out of all Amre Supply Microsoft 365 cloud services affecting all Amre email, OneDrive, SharePoint, and all other M365 services you use with the Amre Supply M365 ID. This is when the M365 data transition occurs. This is merged into your Reliable Parts M365 account. |
Sign in to Use your Reliable Parts M365 ID: first.last@reliableparts.com During this time Amre Supply M365 data is still transitioning to Reliable Parts. You will not see your Amre files until Mon or Tue.
|
Business as usual Day 1 support provided by the Help Desk.
|
||||
On Friday, when your Amre account access is locked out, your M365 data stored in OneDrive, Teams, and other Microsoft services will begin migrating to Reliable Parts M365 tenant. During this time, your old or saved Amre email and your Amre OneDrive may be inaccessible until the data migration completes. This is expected to be completed by Sun Mar 1, but with any complex migrations, we are planning for unexpected events that may delay this process.
You will be able to use your Reliable Parts M365 ID to access your mail online via Outlook web access at https://www.outlook.com.
Important information for remote workers
Resetting your computer happens no differently than resetting computers in offices. For this to happen on time, you must keep your computer PLUGGED INTO POWER or DOCK, TURNED ON, and CONNECTED TO YOUR HOME NETWORK. Computers that sleep will not be updated. You must wake them and keep them up until they restart. Once the computer reset is committed by Wolseley on Friday, the computer should pick up the instruction and begin resetting. This could take anywhere from 10 to 60 minutes from the time you turn on your computer.
IT IS NOT RECOMMENDED TO USE PUBLIC WI-FI. Please do not go to a Starbucks unless it's to enjoy yourself a nice cup of coffee. Often public Wi-Fi has session limits that will kick computers off the network after a short period of time.
Important information for branch and office workers
The network will be in a state of flux on Thur 2/26 through Fri 2/28 due to a major planned reconfiguration. Computers will be on and off the local branch or office network. By Friday afternoon, if a computer has not reset on its own, power down the computer and then power it back on. It will reacquire an IP on the network and continue the reset process. It may not be immediate, so give it 30 to 60 minutes.
Enrollment network available
We've made an Internet-only Wi-Fi network at all branches and offices. You can find this network by opening up your Wi-Fi settings and selecting the SSID RPIopen. This is a temporary Wi-Fi for the purpose of connecting computers to the Internet so that they will receive instructions to reset and build.
LEAVE YOUR COMPUTER(S) PLUGGED IN, POWERED ON and CONNECTED TO A LIVE NETWORK/WI-FI AT ALL TIMES. DO NOT POWER DOWN.
Getting support
DO NOT reach out to the Reliable Parts Help Desk to inquire or update us about the status of your computer. We have telemetry that will keep us informed. There may be some situations that will require escalation to the Help Desk that you need to be prepared for. This article outlines the most common issues and expectations.
Where to ask questions
We do not want you to open tickets if they can be avoided. Start by asking your peers or manager about the status of your computer. Managers are being instructed to relay information to the Help Desk in our LIVE support Teams channel.
What to do in the event of a failure
We are aware that some computers will not reset and therefore will be unusable after Fri. We will reach out to you shortly to discuss options.
For those with computers that fail unexpectedly, you will need to open a ticket for tracking. This will likely require that we send you a computer, or you will (if practical) need to come to the corporate office to OSR your computer. Regardless, you will be instructed on what to do.
When to open a ticket
You will be using your Reliable Parts email address to sign in to the Help Desk at https://support.reliableparts.com. You may only be able to do this from a smartphone or another computer if the computer you're opening a ticket about is unavailable. Some of the following examples explain what might occur. In these cases, open a ticket on the Reliable Parts Help Desk for tracking and follow-up.
- Windows reports that "reset failed" and returns to desktop
- Windows never begins to reset and returns you to your sign-on screen and desktop
- black screen, computer won't start
Provide the following information
- 7-digit SERVICE TAG on the back or bottom of the computer
- a description of the failure
- shipping address
- a phone number where we can reach out
- non-business email address
Back up important data to your Amre OneDrive
You are the only person that can ensure all your important files are safely stored in your Amre OneDrive folders. Important files include:
- password backup from browsers
- bookmark/favorite backup from browsers
You must ensure your Amre OneDrive is synced to the cloud. If there is a sync error, you will lose those files that did not sync. Clicking on this icon on the taskbar will present you with a list of files recently synced, and it will tell you whether all the files are synced or not.
for illustration only, will show OneDrive - Amre Supply
Any of the following icons indicate syncing is occurring, sync is paused, or there is a problem that needs to be addressed before syncing can continue.






Typically, we DO NOT want you to move an Outlook PST file to OneDrive, as it is large and may cause issues with your sync. However, for the purpose of this move, you may AFTER you've confirmed your sync is complete of all other important data. Do this only after all data has been synced.
LEAVE YOUR COMPUTER(S) PLUGGED IN, POWERED ON and CONNECTED TO A LIVE NETWORK/WI-FI AT ALL TIMES. DO NOT POWER DOWN.
Save files to your Amre OneDrive
- All files stored in folders that ARE NOT backed-up automatically by OneDrive should be checked.
-
OneDrive icons
or
will be saved in the cloud and locally. Files with
indicate the file is stored in the cloud. Files with
are files that are shared with other people. Any other symbol indicates that the file is syncing OR is unable to sync. For information about icon status, see What do the OneDrive icons mean at the Microsoft support site.
IMPORTANT Shared files will likely become disconnected in the process. You will have to RESHARE files with employees. DO NOT DELETE FILES FROM YOUR ONEDRIVE. Deleting files from your OneDrive will delete them from the cloud.
- Check DESKTOP, DOCUMENTS, PICTURES, MUSIC, VIDEOS folders to ensure they're backed up to the cloud. To check, see Back up your folders with OneDrive at the Microsoft support site. In general, if the file DOES NOT have the icons
- DO NOT save program and app files to OneDrive. These will be provided to you.
-
- (Optional) Moving Outlook PST files containing offline email storage to OneDrive (if you have knowingly done this). IMPORTANT Outlook MUST NOT BE RUNNING to move the file. Once it's moved, DO NOT OPEN IT AGAIN in Outlook.
Exporting browser bookmarks/favorites and passwords
Passwords will be securely stored in 1Password after you've moved under Reliable Parts security management. Depending on your primary browser, your data may or may not transfer automatically. The key difference depends on whether you are SIGNED IN to a company or personal account. If you are SIGNED IN, then the following is a recommended step just in case there are issues with importing data from your Microsoft account.
However, if you DO NOT sign into your browser with a Microsoft or Google account, then YOU WILL LOSE YOUR BOOKMARKS/FAVORITES and PASSWORDS if you do export them to your Amre OneDrive. We've provided instructional pages here:
- Microsoft Edge passwords
- Microsoft Edge passwords and Favorites
- Google Chrome passwords
- Google Chrome Bookmarks
Computer setup walkthrough
A successful reset will result in your computer being ready for you to begin setup with a language selection screen. You'll follow the on-screen instructions, answering the questions through the Microsoft sign-on screen and eventually to the desktop.
LEAVE YOUR COMPUTER(S) PLUGGED IN, POWERED ON and CONNECTED TO A LIVE NETWORK/WI-FI AT ALL TIMES. DO NOT POWER DOWN.
What to expect during computer setup
Setup is a complex process, and it requires that the computer remain on and connected to the network at all times.
- The computer will restart multiple times.
- Your M365 ID will require multi-factor authentication. We recommend you download the Microsoft Authenticator for push authentication to your smartphone.
- If you lock yourself out, wait 15 minutes to try again.
Windows 11 setup walkthrough
If the computer resets are successful, after resetting the PC, each will arrive at the following screen.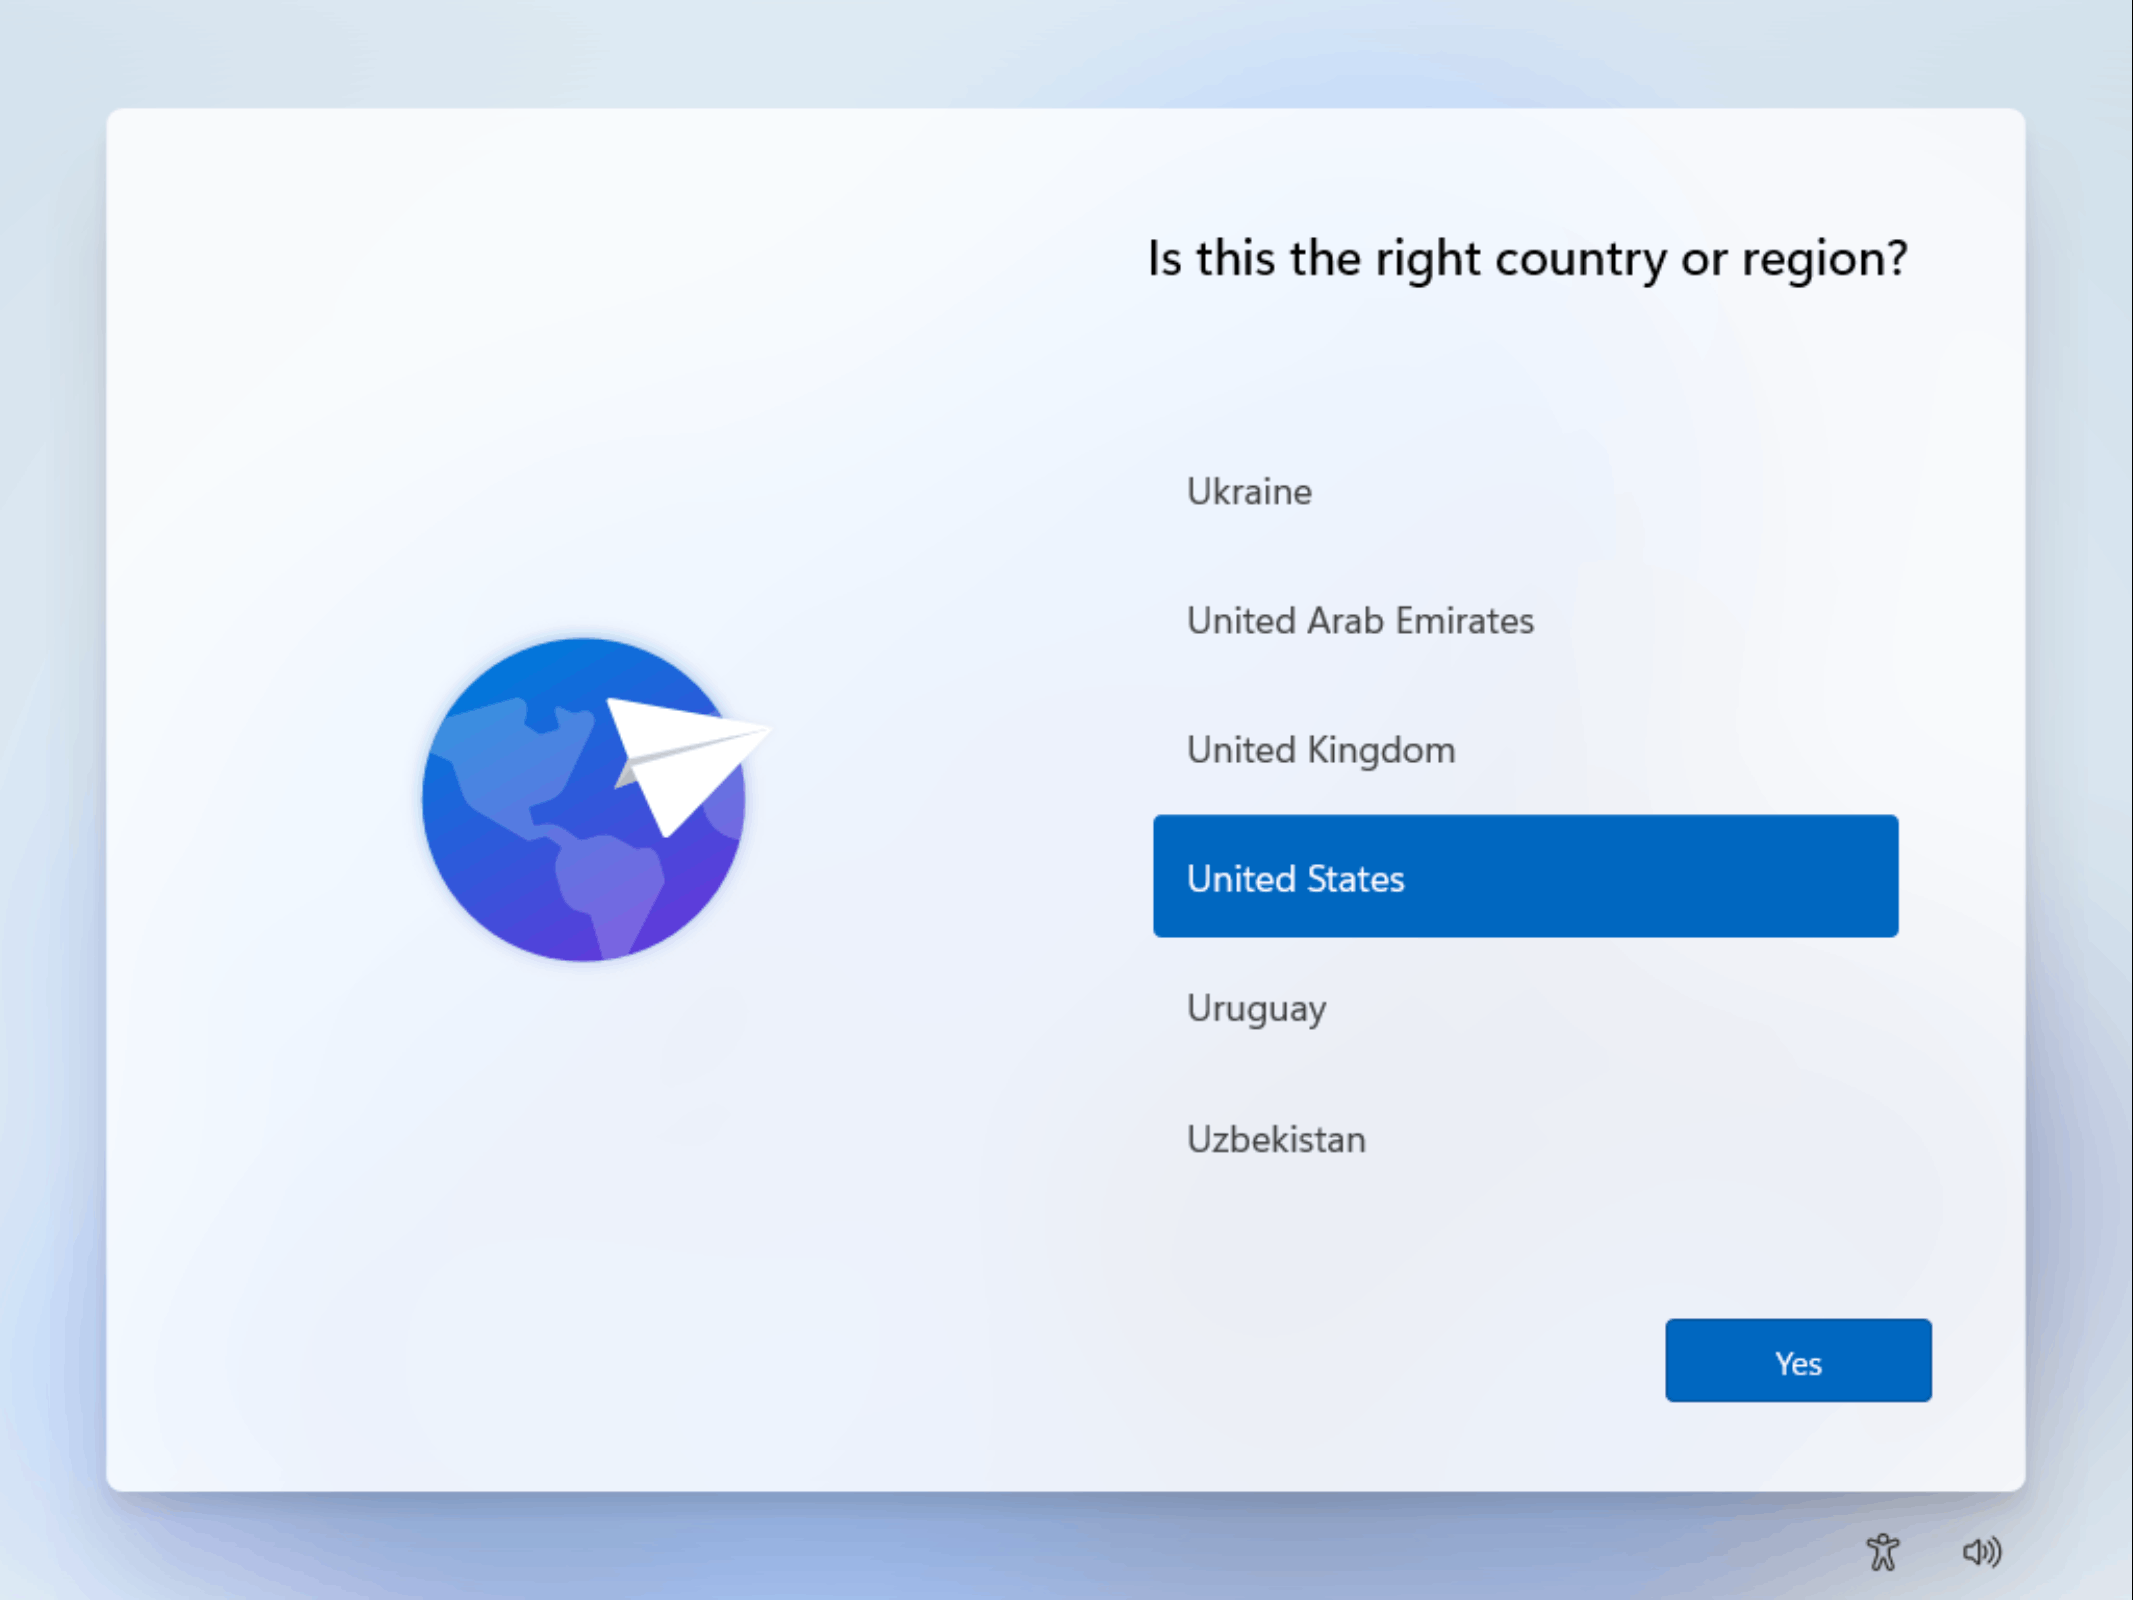
STOP If you do not see this screen, reboot the computer before doing anything else and then wait. If it ends up back at the RED Wolseley desktop, please report this to your manager along with the computer's 7-digit service tag.
- Language = English
- Region = Canada
- Keyboard = what is appropriate for you and press Enter (or click Yes).
- Second Keyboard = press Enter (or click Skip).
- Network (wireless only) = connect to your home network. If at the office, you must connect your computer to the LAN. There is no open Wi-Fi.
- Windows 11 checks for updates to base image (automatically), the computer may restart.
- Sign-on with your Reliable Parts. Use your first.last@reliableparts.com M365 ID to sign into the computer.
- You may be dropped to the boot screen (black) and asked whether to clear the Trusted Platform Module (TPM). You want to clear the TPM on the computer. Any selection allows the computer to continue and setup.
- Windows Hello screens for BIOMETRIC setup using your face or finger access to the device (if applicable on capable devices). Your biometric data is stored local to the computer, and is never transmitted to the cloud.
- Windows Hello screen for PIN setup.
-
Continuation of account, device, and security setup. This screen will FAIL, and there is a CONTINUE ANYWAY link that can be pressed. DO NOT CLICK TRY AGAIN or RESET DEVICE.
IMPORTANT YOU DO NOT NEED TO REACH OUT TO HELP DESK FOR ASSISTANCE WITH THIS SCREEN, 100% of computers will receive this error.
- You will eventually land on the Desktop.
- Apps are still loading in the background. You can use Edge or anything else that comes standard with Windows 11. Open the Company Portal to see the progress of installing apps.
LEAVE YOUR COMPUTER(S) PLUGGED IN, POWERED ON and CONNECTED TO A LIVE NETWORK/WI-FI AT ALL TIMES. DO NOT POWER DOWN.
Using your computer
After you've landed on your new desktop, you can begin using it. From now on you'll use your first.last@reliableparts.com to access most services, including signing into your computer and all Microsoft online services.
Company Portal to install apps
The Company Portal is a Microsoft application installed on organization-managed workstations that serves as a centralized hub for you to access corporate resources and manage your device compliance. You can browse and install approved business applications, view device compliance status, and access company-specific information and policies through a user-friendly interface.
| Through the Company Portal, you can self-service many IT needs, including software installations, device enrollment verification, and accessing corporate resources like internal websites or cloud applications. The app also provides notifications about policy updates, required software updates, or compliance issues, enabling users to resolve many IT-related matters independently while ensuring their device remains properly configured for corporate security standards. |
IMPORTANT DO NOT attempt to download the Company Portal if it hasn't arrived on your computer. Company Portal will arrive within the hour after you land on the desktop.
The app downloads and updates view show you what is currently downloading.
Using Outlook app on company computers
Outlook is the corporate standard on the desktop. Former Amre Supply employees will be able to use Outlook to send from and receive emails to your unified Inbox from both Reliable Parts and Amre Supply email addresses.
See Microsoft's instructions Change the account used to send email messages to enable this feature from within the Outlook app.
New Outlook
Open a new mail message, then:
- Click Options.
- Check Show From.
- Click the From dropdown to select or add a new email address.
Old Outlook
Open a new mail message, then:
- Click Options.
- Click From.
- Click the From dropdown to select or add a new email address.
Smartphones (iOS & Android)
There are two types of smartphones: company-provisioned and bring your own. You're more than welcome to use your smartphone if you are not an hourly employee.
At this time, company-provisioned smartphones will not be migrated to Reliable Parts until post conversion. Your phone will continue to operate normally. However, after Feb 27, 2026, Wolseley will lock you out of your Amre Supply Microsoft 365 account, which WILL sign you out of Outlook and may delete the Outlook app from your phone. This is expected, and the following information tells you how to access the smartphone store and download Outlook to your phone again.
Accessing email on personal and company-provided smartphones
You can only use the approved Microsoft Outlook app on iPhones and Android. You cannot use 3rd-party email apps. On your smartphone, download the app from the Apple App Store or Google Play Store and then proceed to use your Reliable Parts M365 ID first.last@reliableparts.com.
- If you are using the app for the first time, tap Get Started. If you already have an account set up, tap the Menu icon (three horizontal lines) in the top-left corner.
- Tap the Settings icon (gear icon) at the bottom of the menu.
- Select Add Mail Account.
- Enter your email address and tap Add Account.
- If prompted, choose your account provider = Microsoft 365
- Enter your password and tap Sign In.
Official instructions on how to do this can be found on the Microsoft site, Setup Outlook for iOS and Android.
Agent-led supplemental recovery options
Amre branches received Dell Computer OS Recovery sticks that can be used to reload computers with Windows from a failed state. This must be completed under the direct supervision of an Help Desk Agent.
How to use the Dell computer OS reset procedure (OSR)
Known issues
Some OSR sticks will report that the OSR was created for another computer. No further explanation, and it fails to start. The computer will need to be sent to the corporate office for recovery. Possible correlation to models Latitude 5450 and 5420 (others being confirmed during conversion). Alternatively, try another OSR stick to see if you get the same results.
Branch hardware staging procedures
This section is for branch and office managers and employees.
About branch and office wireless networks
Wireless assignments are partitioned for different types of devices and uses. Here is the list of SSIDs and what they're for.
- Reliable Parts Secure - assigned computers by employee name connect automatically to this SSID, it's also known as RPISecEAP.
- RPISecMAC - wireless printers and scanners are connected to this SSID.
- RPIVoice - reserved for wireless handheld Grandstream or Cisco phones.
- RPIOpen - temporary wireless network for accessing only the Internet. Will be removed post conversion.
- RELIABLE - disconnect from this network if you are connected to it.
Network migration schedule
The network is scheduled to begin migration on Thu Feb 26 and Fri Feb 27. The local area network and Wi-Fi will be unavailable sporadically throughout the day.
Our smart hands partners BlueSky and Newlinc will be on-site physically making the changes to the network at each location. Our expectation is that someone is on-site at all times through the day during business hours to facilitate network- or computer-related activities.
Thursday Feb 26
- CA069 Mississauga 8AM EST/7 AM CST Done
- CA003 Calgary 9AM CST Done
- CA002 Edmonton Downtown 9AM MST/10AM CST (Newlinc) Done
- CA102 Richmond 9AM PST/11AM CST Done
- CA036 Scarborough 12PM EST/11AM CST Done
- CA101 Edmonton South 12PM MST/1PM CST (Newlinc) Done
Friday Feb 27
- CA006 Winnipeg 8AM CST Done
- CA005 Saskatoon 9AM CST Done
After all visits are completed, no other visits will be scheduled.
Computers
All branches have an excess of computers. Some computers were delivered by Reliable Parts in advance to supplement using Amre computers.
Counter computers
- Connect computers to a LAN port or to the secondary LAN port on a Cisco phone.
- Connect the payment terminal to the USB port.
- Turn on computer.
- Walk through Windows 11 setup procedures above.
KIOSK computers
- Kiosks are WIRELESS only once configured.
- When they arrive, plug them into the network with a LAN cable. We'll inform you when you can disconnect it from the LAN.
Warehouse computers (not including the KIOSK)
- Connect computers to a LAN port or to the secondary LAN port on a Cisco phone.
- Turn on computer.
- Walk through Windows 11 setup procedures above.
Cisco desk phones (counters and branches)
Branch phones have been delivered and pre-programmed. Once connected to the network, they will receive their programming. They do not have a power supply; they get their power from the network connection directly. Plug the ethernet cable into the ethernet port with the network symbol on it.
You can daisy-chain computers to a phone if you are limited on the available ports. The phone acts as a passthrough. Flip the phone over and find the second Ethernet port with the computer symbol on it.
Agent-led phone resetting instructions
Only perform the following steps on the phone IF directed to do so by a Help Desk agent.
- Press Applications.
- Touch Admin Settings > Reset Settings > All
Softphones (office, call center, remote workers)
These are provisioned, and you will receive a Jabber icon on your Desktop by Monday morning. If you don't have the Jabber icon and you received an email saying you were assigned a Jabber account, all you need to do is down the app from the Company Portal.
Sign in with your first.last@reliableparts.com Microsoft ID.
Printers
Printers will need to be RESET to clear their settings down to the basic configuration. There are two supported printers, Xerox and Ricoh.
IMPORTANT Resetting printers does not apply to Reliable Parts equipment that was consolidated to Amre Supply locations. DO NOT RESET RELIABLE PARTS PRINTERS.
Resetting Xerox printers
The reset is important to clear any fixed or static settings that may have been set. The following instructions bypass any administrative locks set on the printer.
- On the printer LCD Panel, hold down the HOME button for 7 seconds, then release.
- Enter 6789 and touch Enter.
- Touch the Devices app.
- Scroll down and touch the Resets menu item.
- Touch Reset to Factory Defaults.
The printer resets, and the installation wizard appears. Touch through with the following selections:- Language = English
- Network Connection = Ethernet, DHCP ON
- Proxy Server = SKIP
- Date and Time = set this to your local time
- Measurements = US (imperial)
- LDAP = SKIP
- Set Up Apps = SKIP
- Security Settings = SKIP
- Touch Done on the final screen.
The printer will acquire its IP address, becoming available on the network.
NOTE When the printer is reset, the security lock is cleared and replaced with the password being the serial number of the printer.
Resetting Ricoh printers
The reset is critical to clear any fixed or static settings that may have been set that could interfere with Reliable Parts printing technologies. The following instructions bypass any administrative locks set on the printer.
Using the keypad on the front of the printer:
- Hit menu key, Network Properties option opens.
- Hit OK key for Network Properties
- Hit the change key, Network Config Wizard option comes up
- Hit OK key to enter the config wizard
- Hit the change key, LAN Settings option comes up
- Hit OK key to select LAN settings, wired LAN option comes up
- Hit OK key to select wired LAN settings
- Hit the NEXT option, Auto Obtain (DHCP) option comes up
- Hit the OK button and it will state Wired LAN setting was complete.
- Hit the next option, continually until exit complete.
- Restart the printer
If Agent needs to access the printer via web interface:
- Login > Device Management> Configuration> IPv4> toogle to dhcp active.
0 Comments